
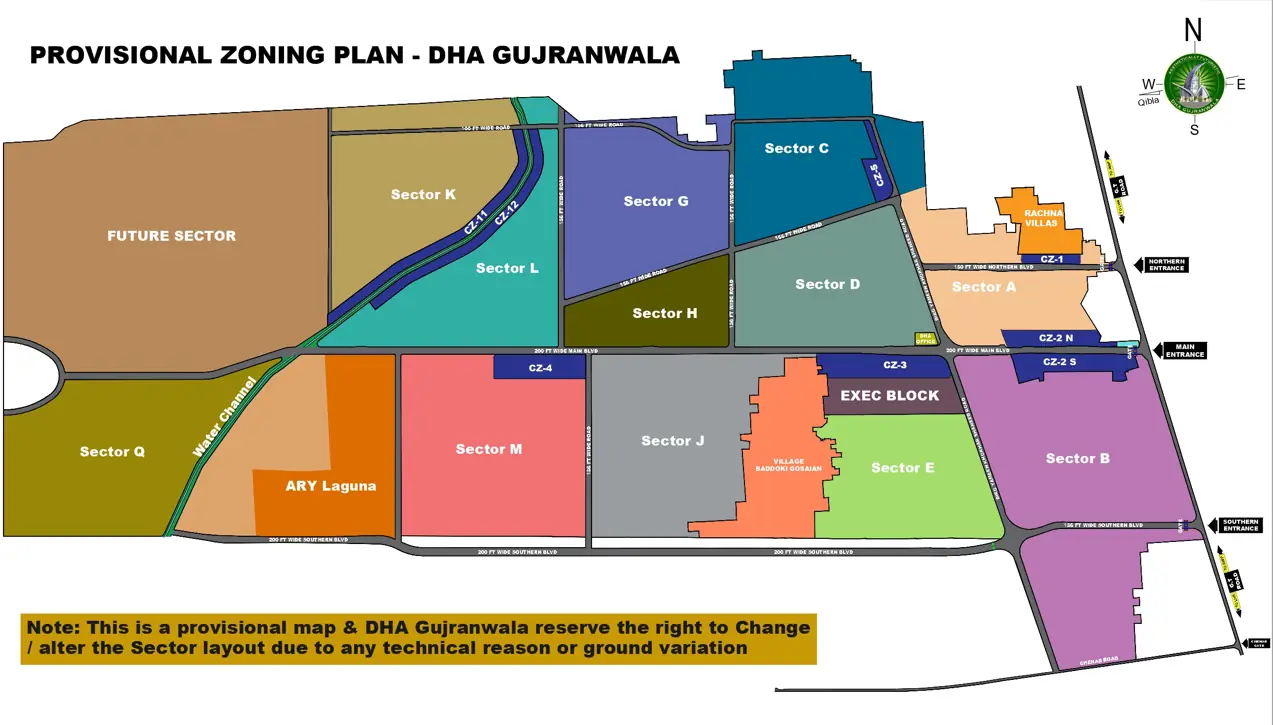
DHA Gujranwala
Sec M – Main Commercial (Annex 'T')
1. What This Map Shows
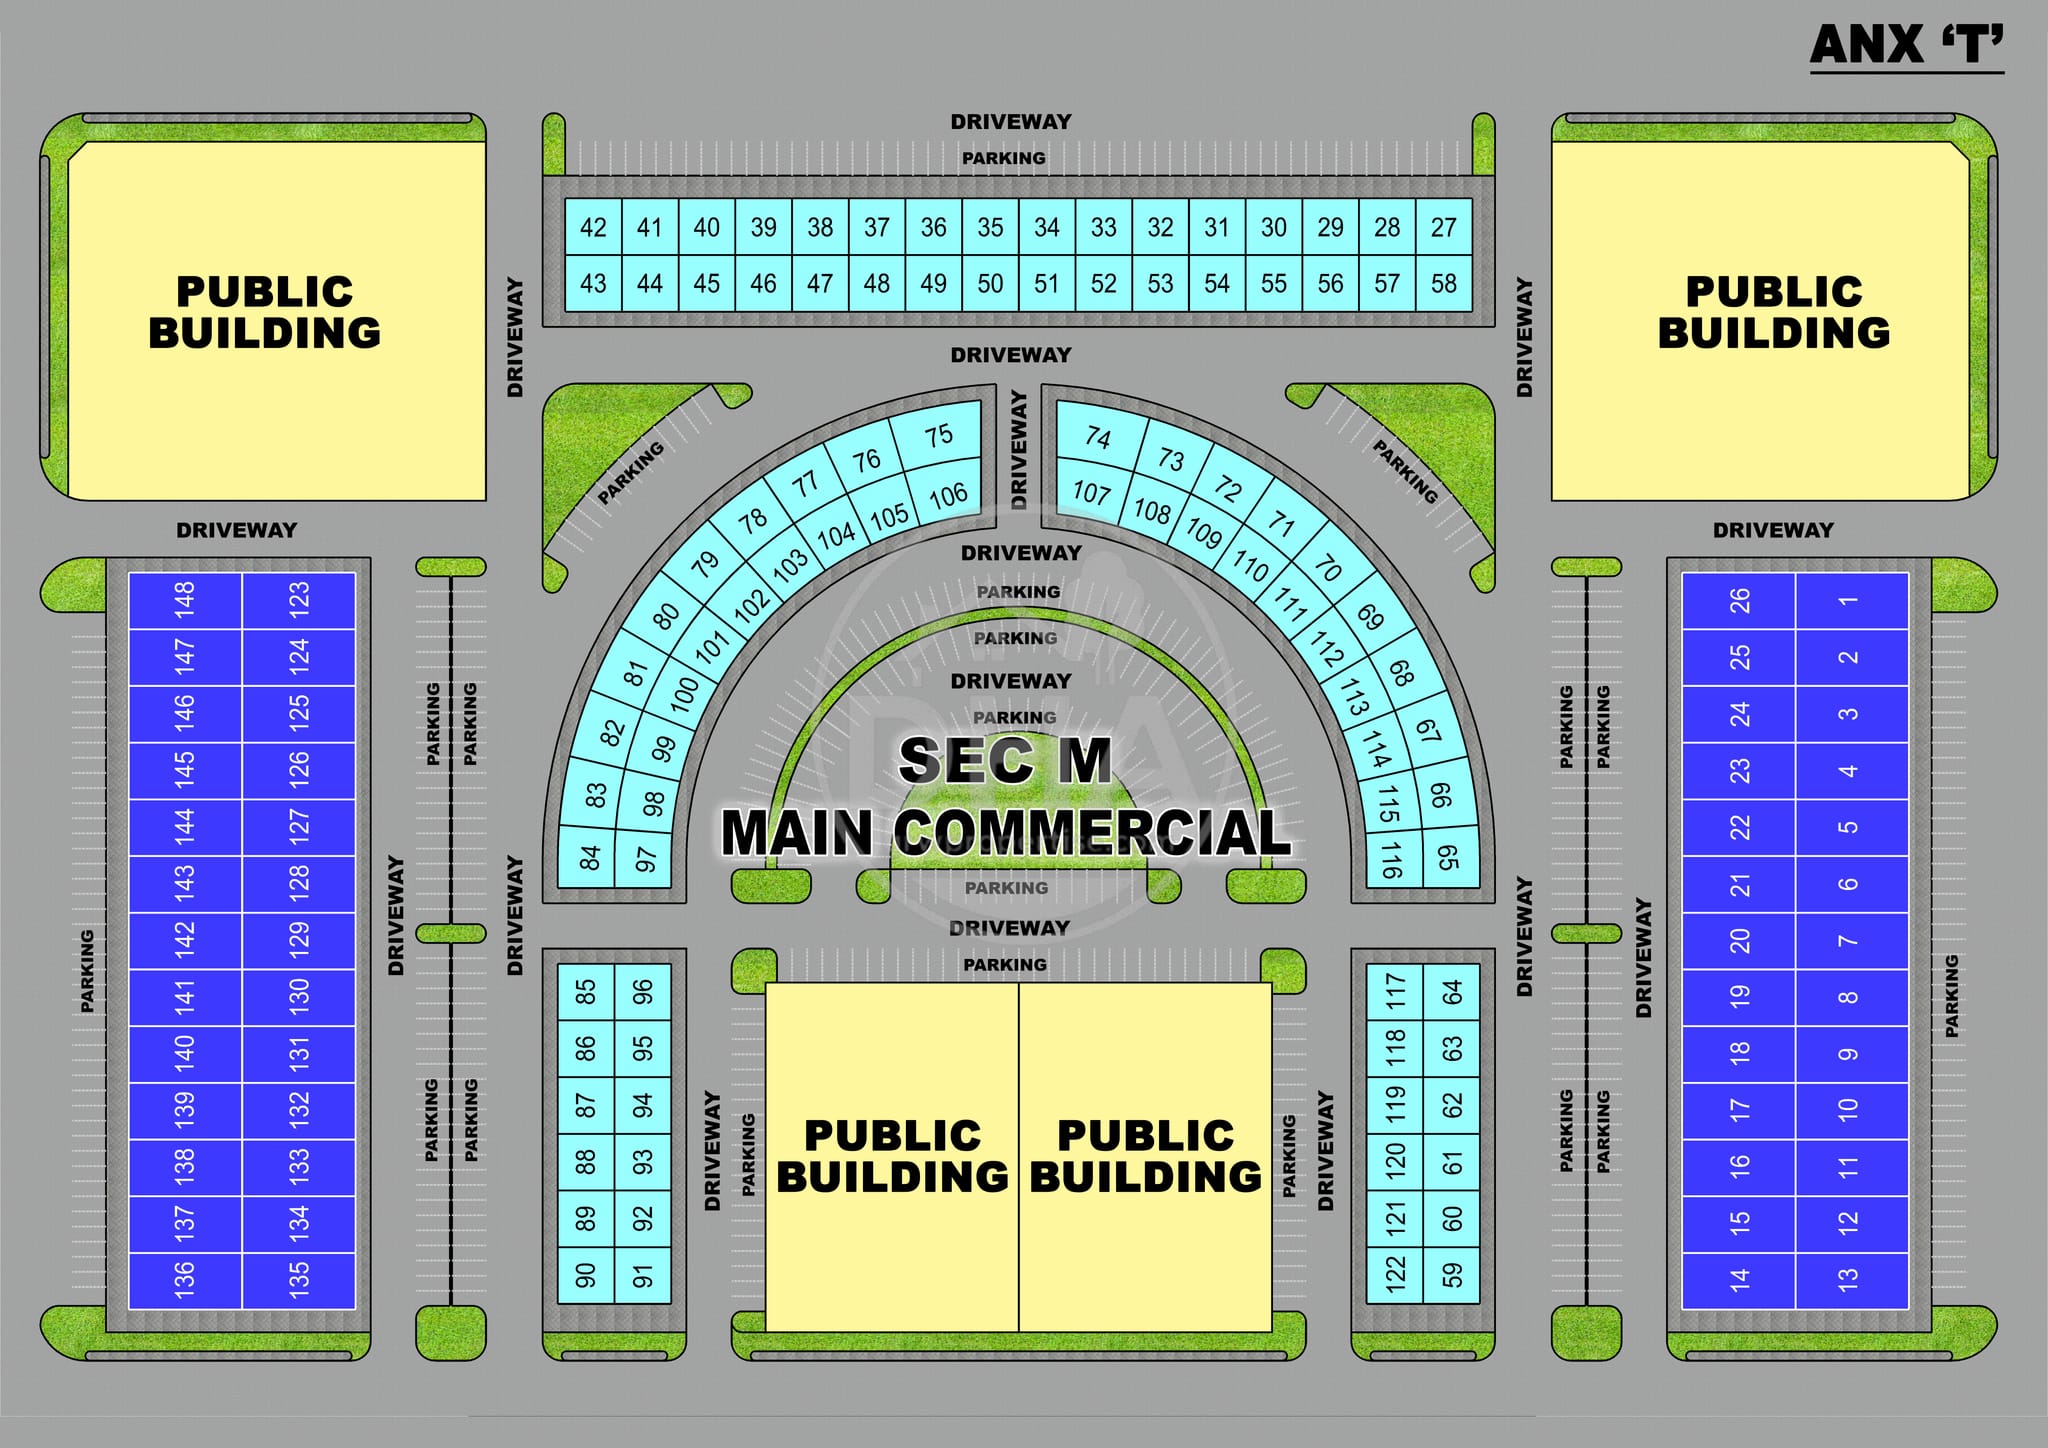
This is the layout plan for Sec M Main Commercial, sitting inside Annex 'T' of DHA Gujranwala Phase 1. It is a self-contained commercial pocket built around one central plaza, with 148 numbered commercial plots and four public-building plots arranged around it in a clear, symmetrical pattern.
Every plot faces either a driveway or the central plaza, and every block has its own dedicated parking strip — so frontage and access are the two things to check first when comparing plots on this map.
2. The Central Plaza
The heart of the layout is the green semi-circular plaza labelled 'SEC M Main Commercial' at the centre of the map. It is ringed by two layers of internal driveways and parking bands, and it is what every plot in the two surrounding arcs (Zones 4 and 5 below) directly faces. This plaza is the premium-frontage zone of the whole block.
3. Public Buildings (Institutional Plots)
Four large plots are reserved as Public Buildings rather than sold as private commercial units:
● Top-left and top-right corners - two large public plots framing the entrance strip.
● South-centre - two more public plots, side by side, facing the plaza from below.
These are fixed anchor points on the map and are useful reference markers when explaining plot direction to a buyer (e.g., 'plot 42 faces the top-left Public Building').
4. Commercial Plot Zones
The 148 commercial plots are grouped into seven clearly separated zones:
| Zone | Plot / Block Numbers | Count | Position on Map |
|---|---|---|---|
| North Commercial Strip | 27 – 58 | 32 | Top boundary, two facing rows, between the two front Public Buildings |
| East Block | 1 – 26 | 26 | Far right edge, two columns, outermost strip on the eastern boundary |
| West Block | 123 – 148 | 26 | Far left edge, two columns, outermost strip on the western boundary |
| West Arc (Outer + Inner) | 75 – 84 & 97 – 106 | 20 | Left half-ring hugging the central plaza |
| East Arc (Outer + Inner) | 65 – 74 & 107 – 116 | 20 | Right half-ring hugging the central plaza |
| South-West Row | 85 – 96 | 12 | Small block left of the two southern Public Buildings |
| South-East Row | 59 – 64 & 117 – 122 | 12 | Small block right of the two southern Public Buildings |
5. How the Numbering Flows
- Plots 1–26 run down the east (right) outer edge, and 123–148 run down the west (left) outer edge - both in a simple two-column, top-to-bottom sequence.
- Plots 27–58 fill the north strip in two facing rows between the top two Public Buildings.
- Plots 59–64 and 117–122 sit in the small south-east block, and 85–96 sit in the small south-west block, flanking the two southern Public Buildings.
- Plots 65–116 form the two semi-circular arcs hugging the central plaza - 65–74 and 107–116 on the east arc, 75–84 and 97–106 on the west arc - with the inner-ring numbers (97–116) sitting closer to the plaza than the outer-ring numbers.
6. Landmarks & Access
| Landmark | Location on Map | Purpose |
|---|---|---|
| Public Building (x2, top) | Top-left and top-right corners | Institutional / civic plots framing the main entrance |
| Public Building (x2, bottom) | South-centre, side by side | Institutional plots facing the plaza from the south |
| SEC M Main Commercial Plaza | Dead centre, inside the semi-circle | Central green with layered parking rings and driveways — the focal point the plots face |
| Driveways | Framing every block | Vehicular access surrounding each row/arc of plots |
| Parking Bands | Along driveways and inside the plaza rings | Dedicated parking separate from the plot frontages |
7. Quick Takeaways for Buyers
- Plaza-facing plots (65–116) offer the most prominent, central frontage in the block.
- Corner plots near the four Public Buildings benefit from consistent footfall and easy identification.
- East (1–26) and west (123–148) edge blocks offer long, uninterrupted rows - useful for buyers wanting a predictable, driveway-facing plot.
- Every zone has its own adjacent parking strip, so parking access is not a differentiator between plots - layout position and plaza proximity are.
Other Sector Maps
Sec L – Main Commercial (Annex 'S')
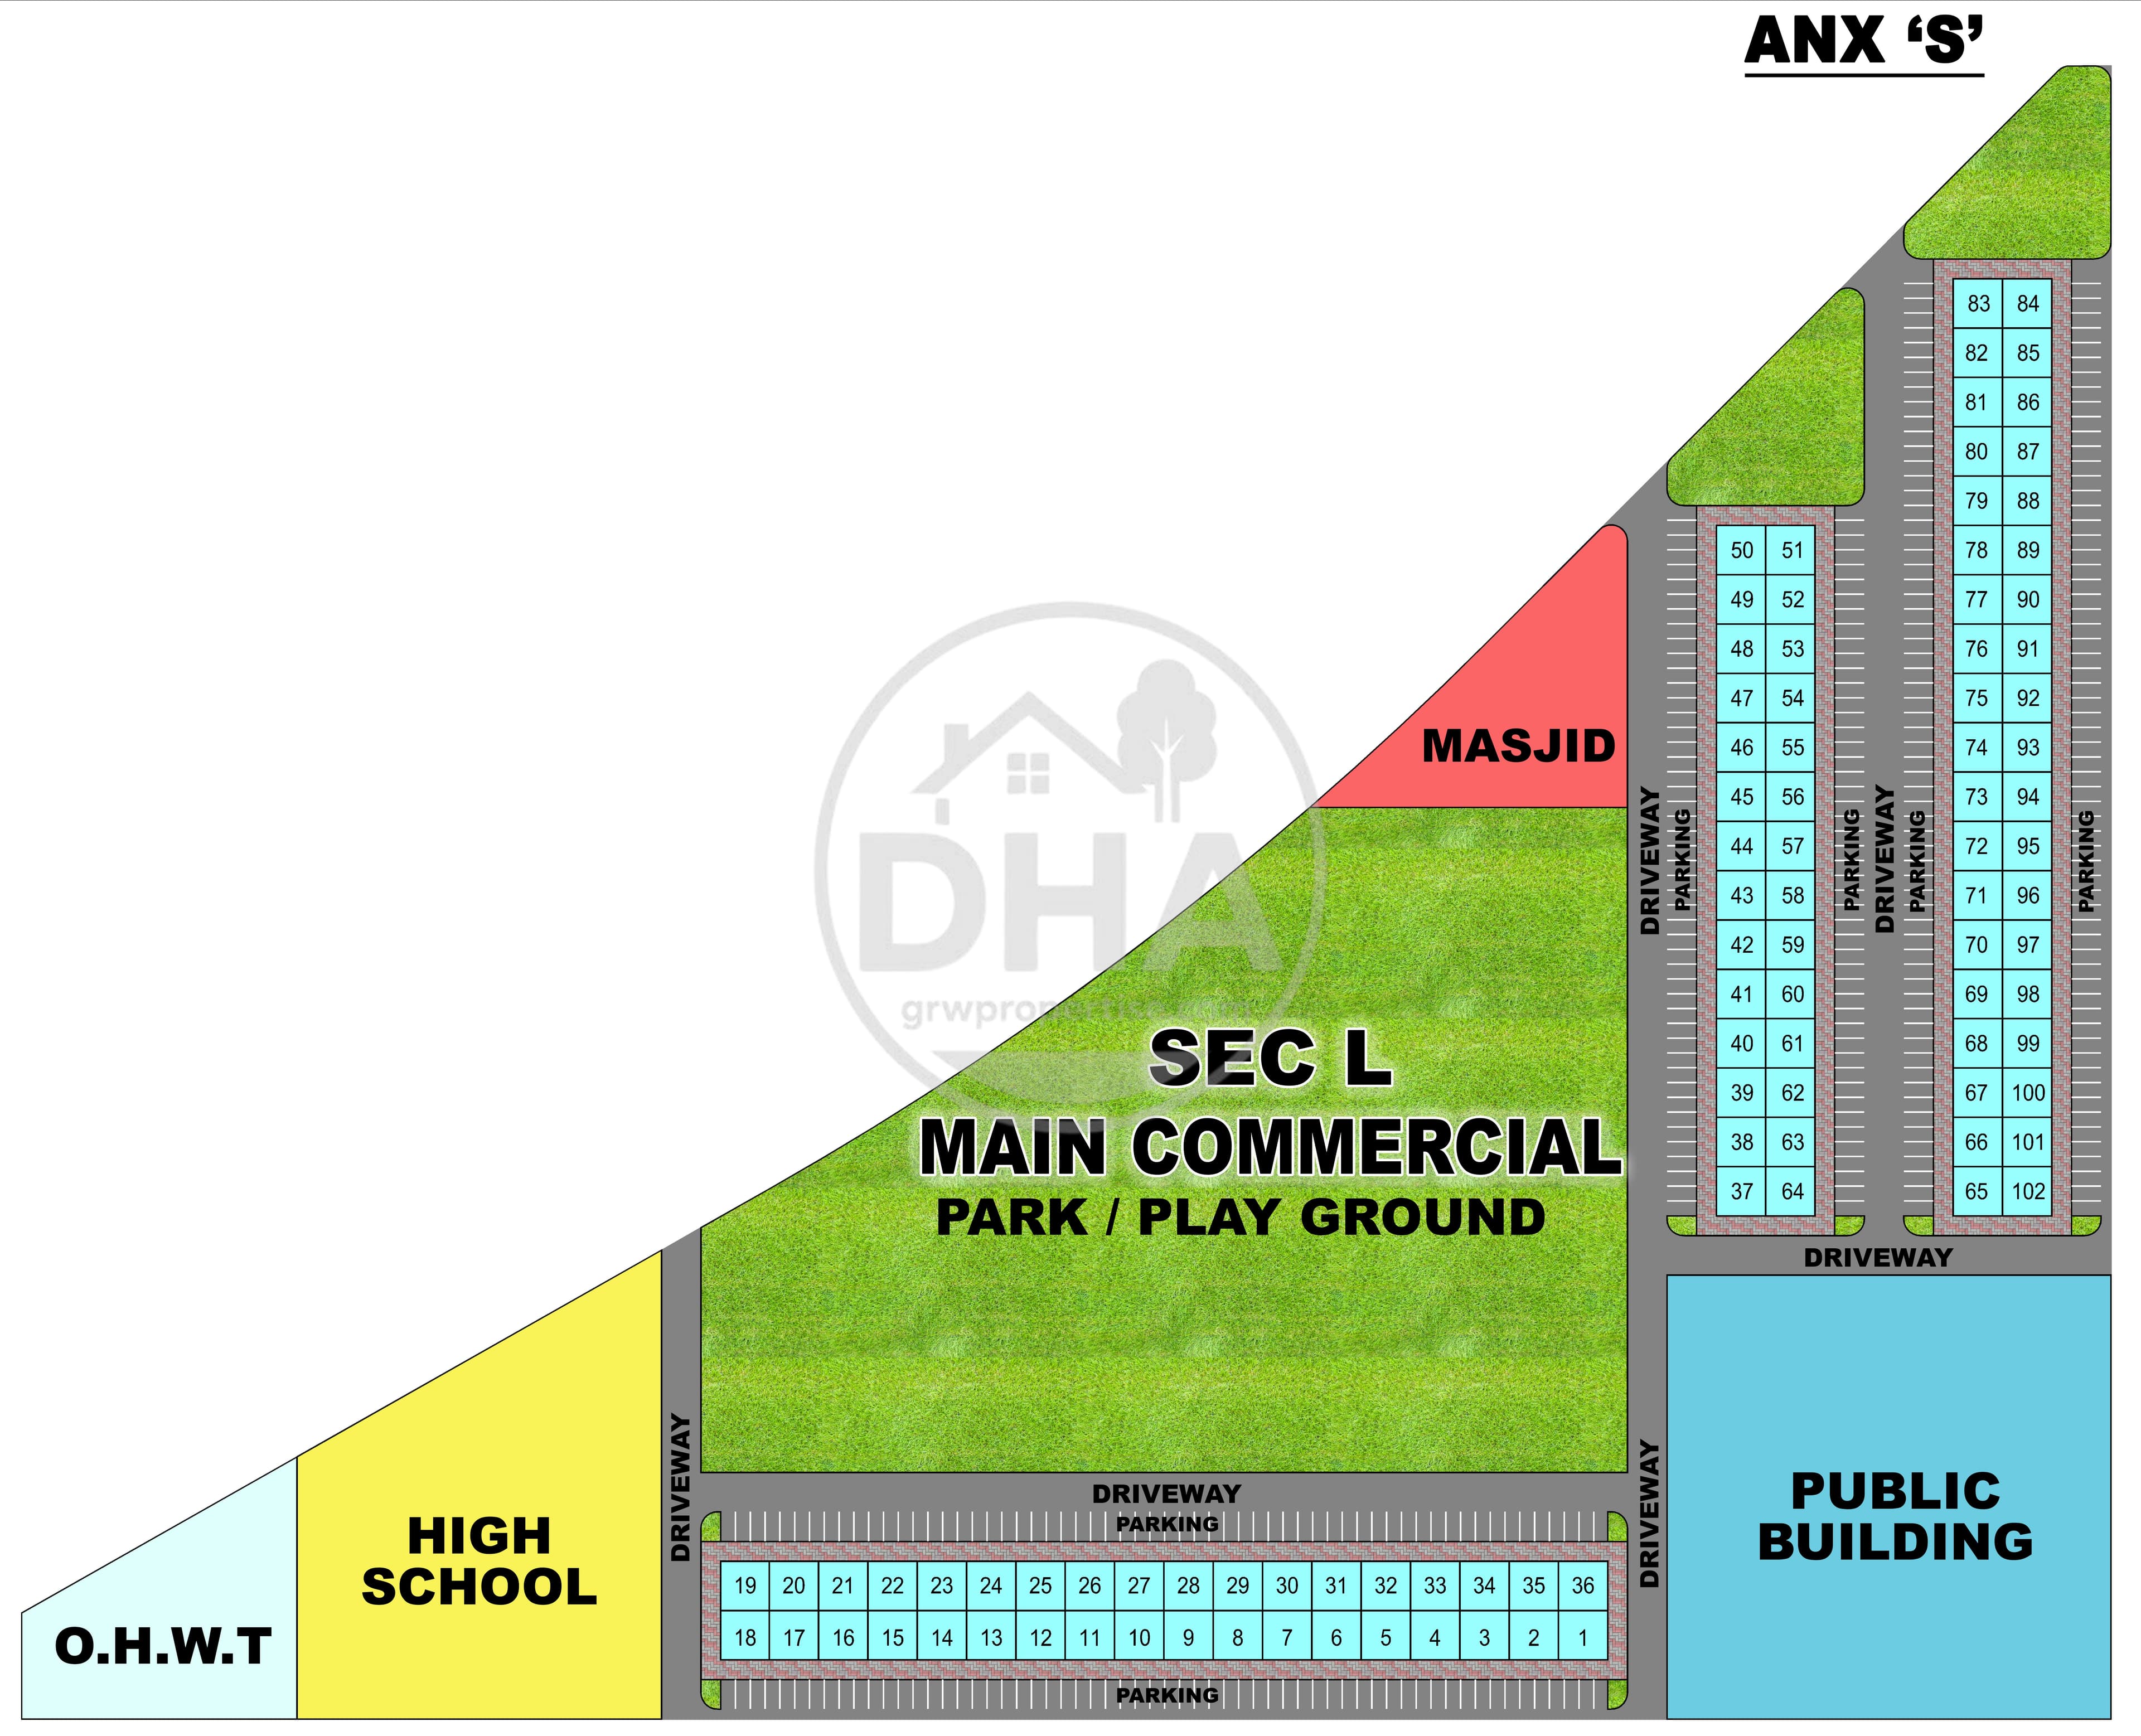
Sec L Main Commercial is the central commercial sector of Annex 'S' in DHA Gujranwala Phase 1, built around a large triangular park with 102 numbered plots arranged across a south row and two park-facing columns. This guide breaks down every zone and landmark on the map so buyers can quickly locate and compare plots by position and frontage.
Sec K – Main Commercial (Annex 'R')
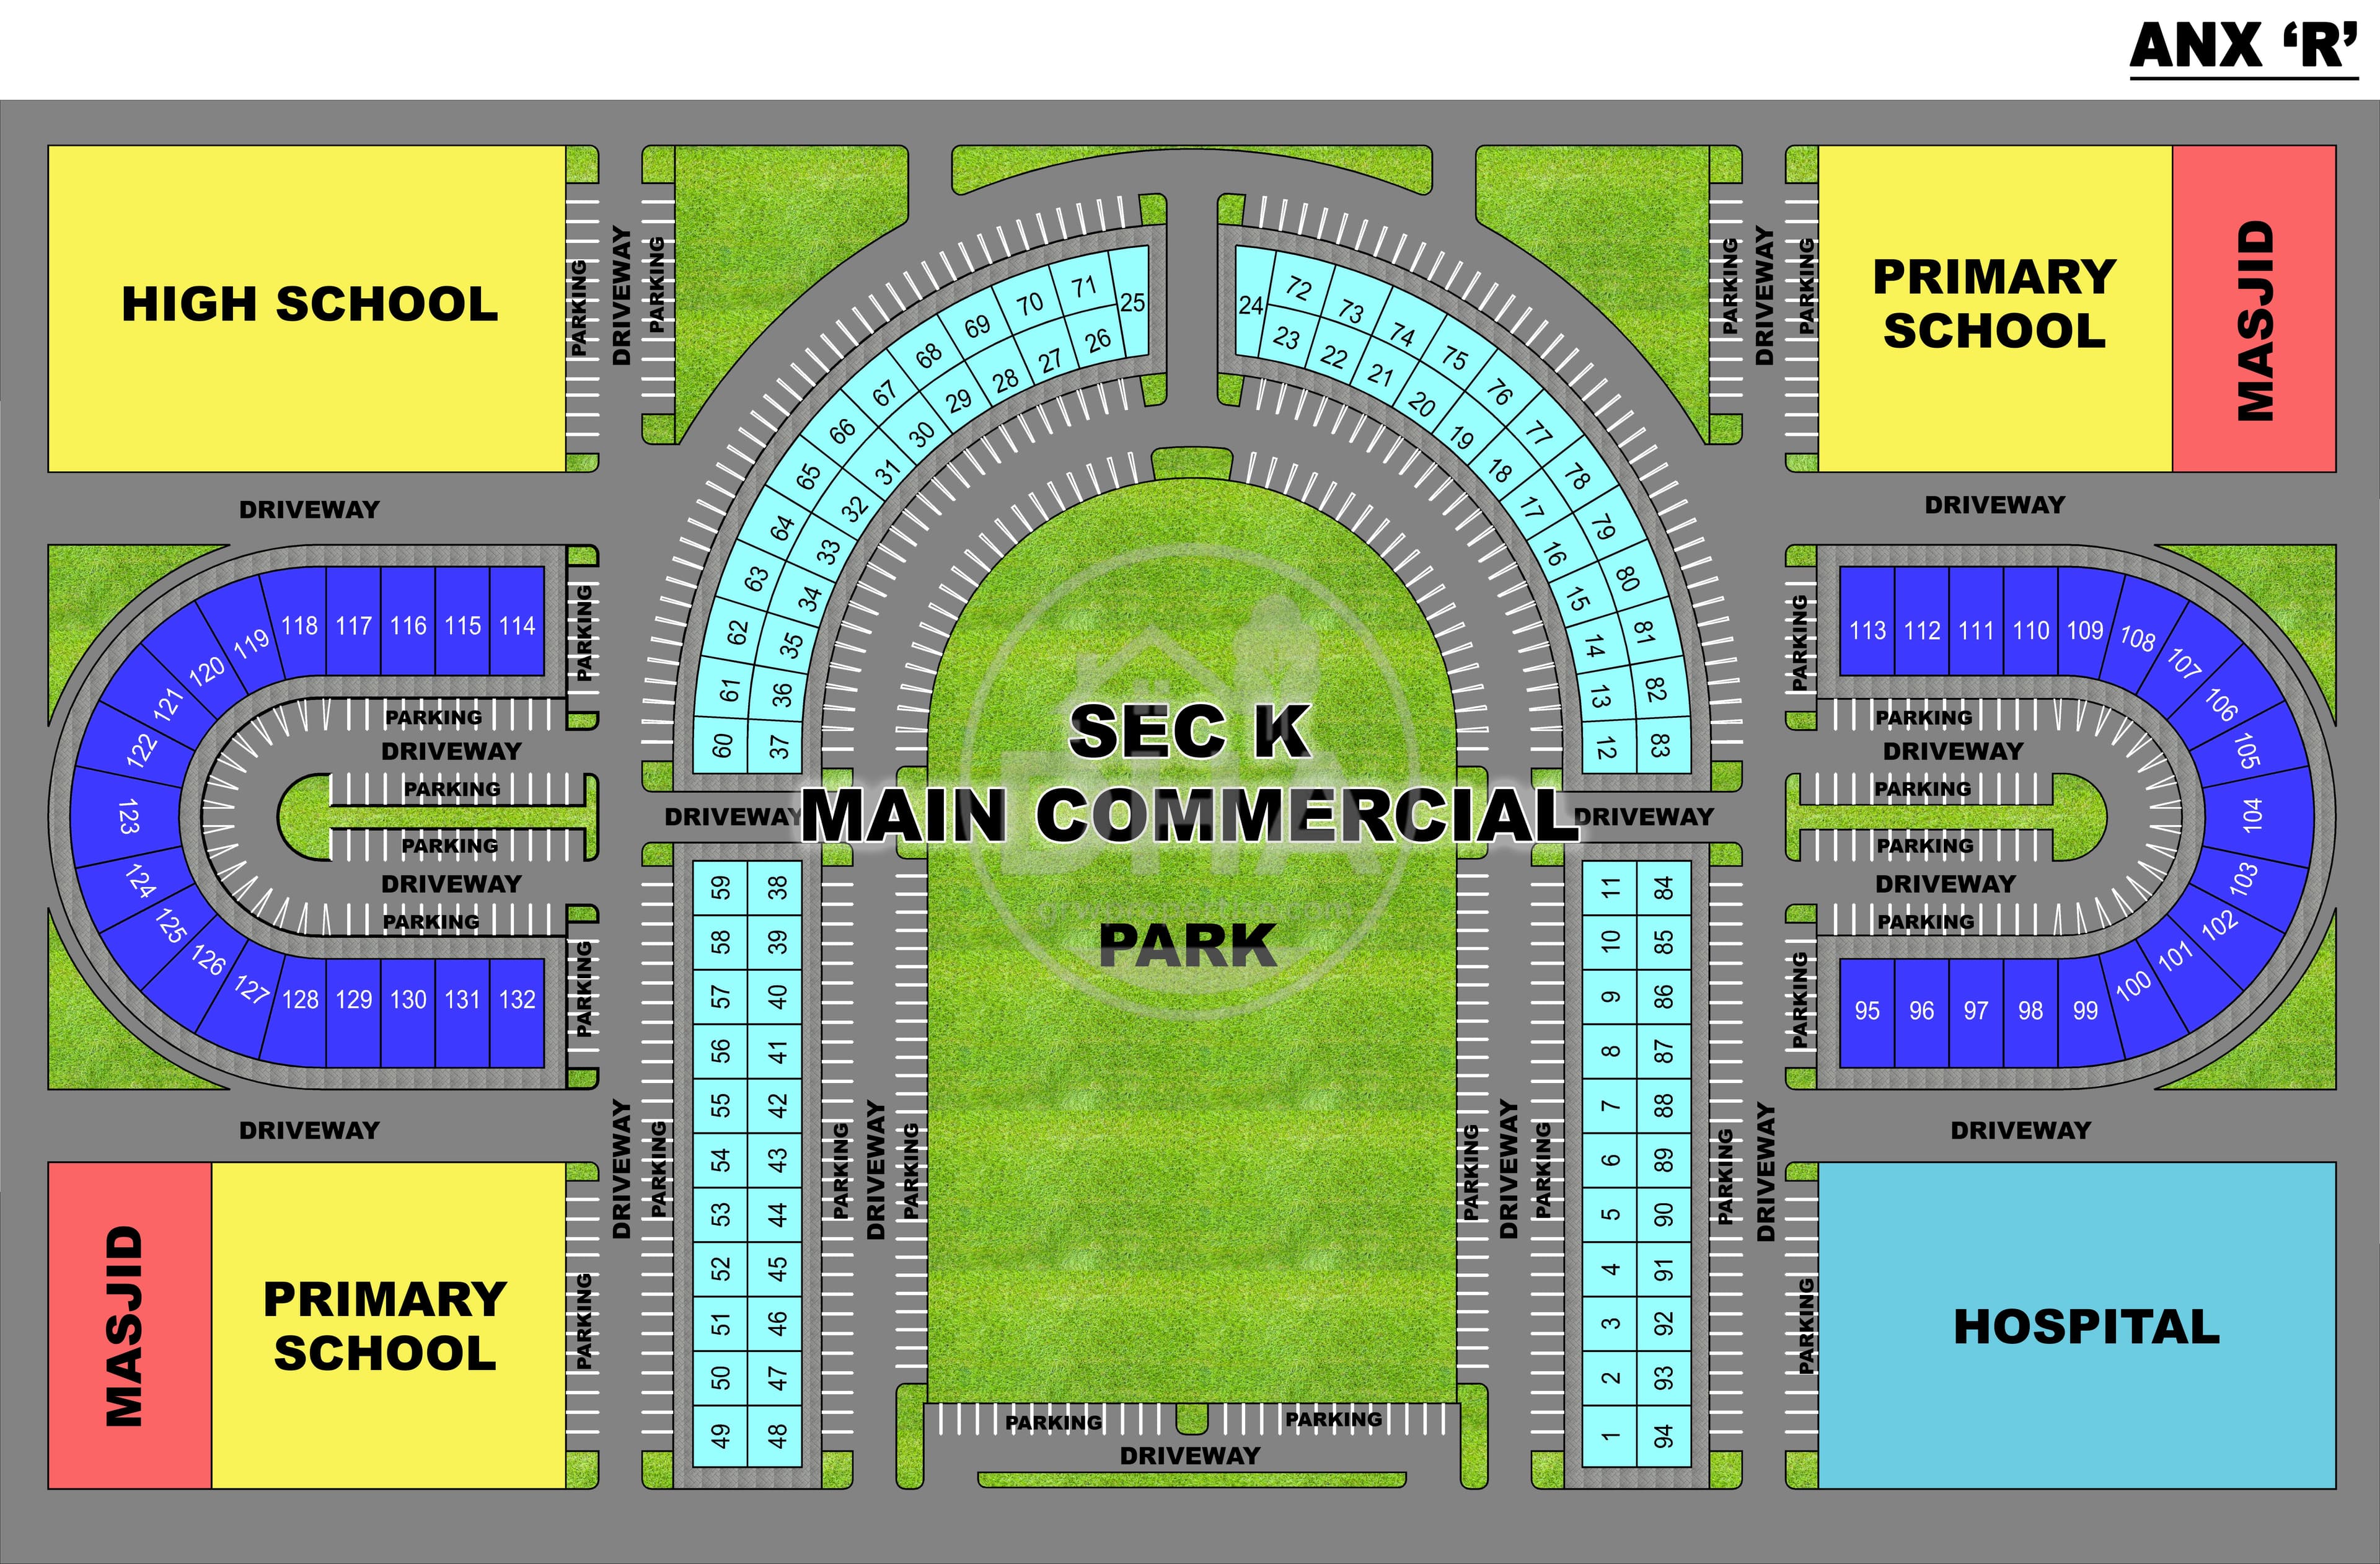
Sec K Main Commercial is the central commercial hub of Annex 'R' in DHA Gujranwala Phase 1, built around a large park with 132 numbered plots arranged across paired arcs, mid-block columns, and two cul-de-sac loops. This guide breaks down every zone and landmark on the map so buyers can quickly locate and compare plots by position and frontage.
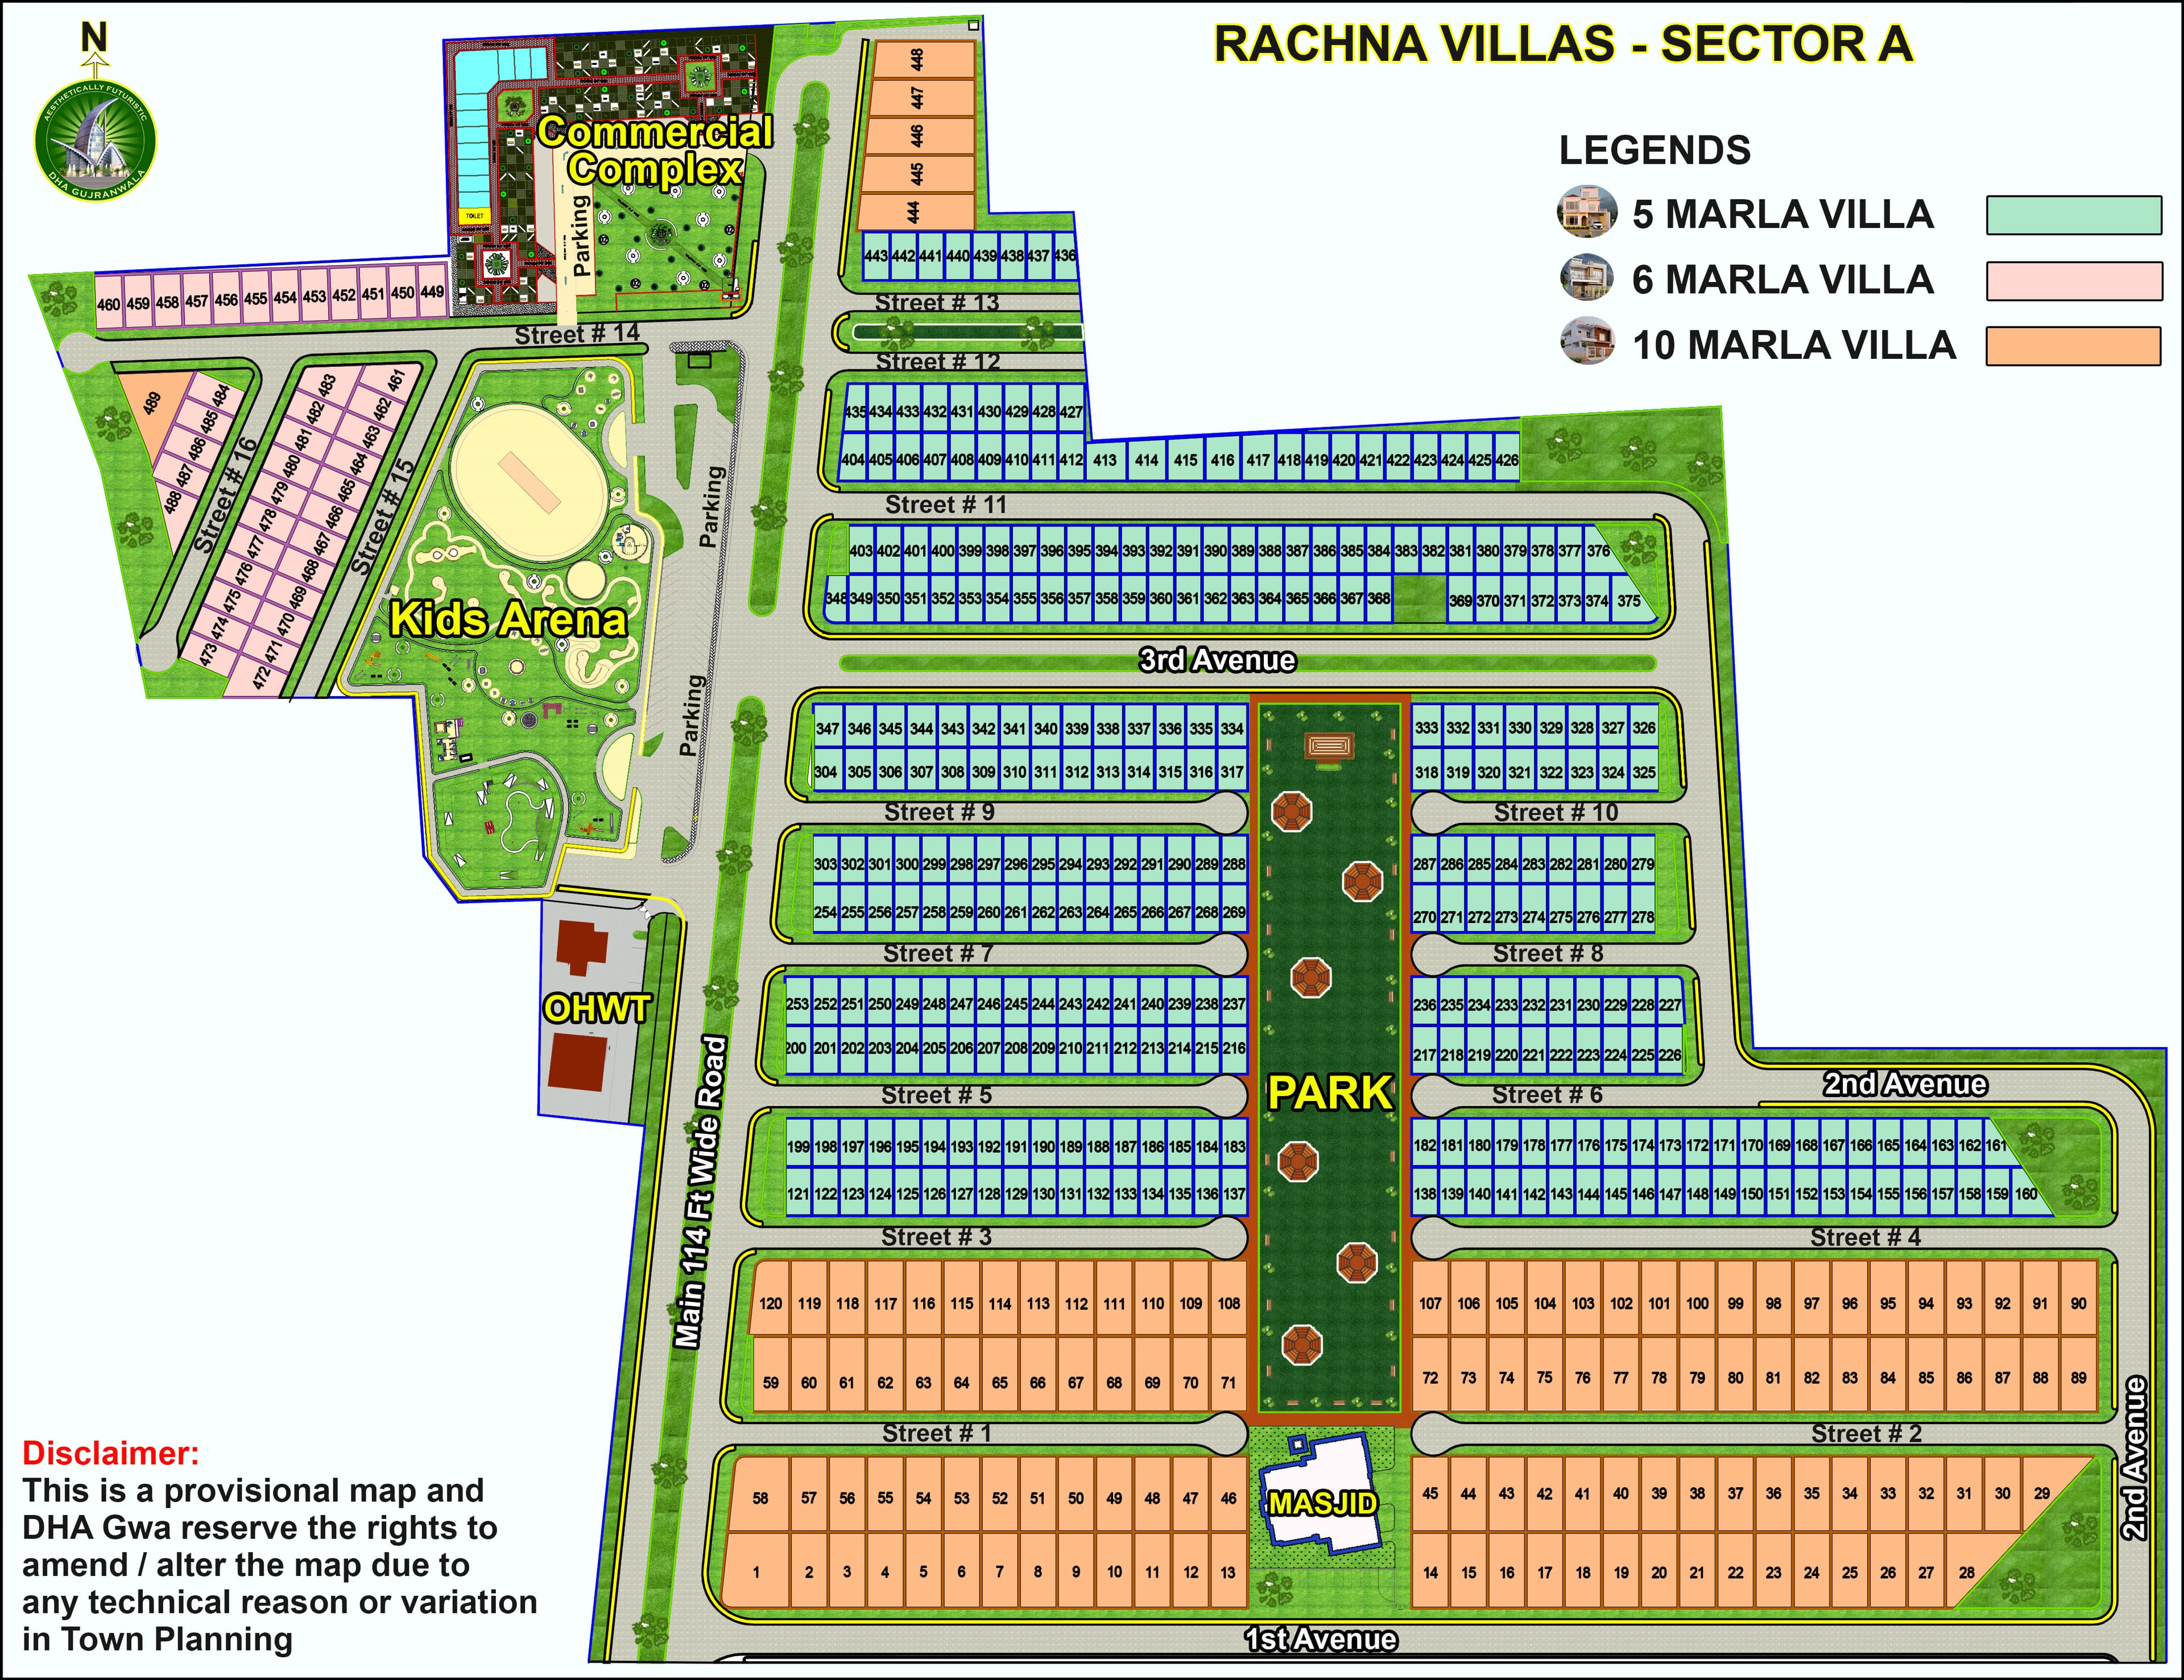
Rachna Villas - Sector A Map : Complete Guide for Investors & Home Buyers
Rachna Villas – Sector A is a planned residential block in DHA Gujranwala offering 5, 6, and 10 Marla villas arranged around a long central Park. The block is fully equipped with a dedicated Commercial Complex, Kids Arena, and Masjid, making it a well-rounded option for both families and investors.